Solar Powered Air Quality Sensor
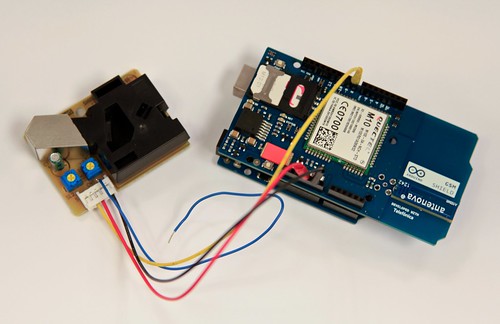
This tutorial covers the fundamentals of deploying a solar powered air quality monitor using the cellular network. Though we are using a dust particle sensor to measure air quality, the same setup could easily be modified for other sensors including tempurature/humidity sensors, gas sensors and water quality sensors. This setup also uses the Xively platform which allows for real-time data streams to be displayed on the web. To begin, you will need:
- Arduino Uno
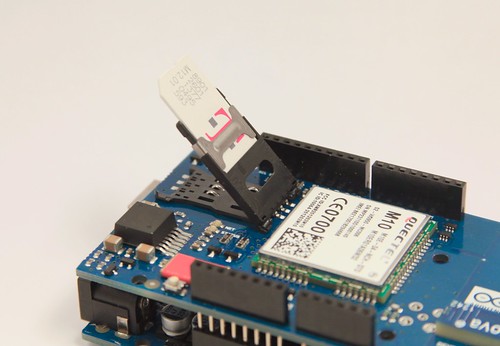
- Arduino GSM Shield
- Active SIM Card (AT&T or T-Mobile)
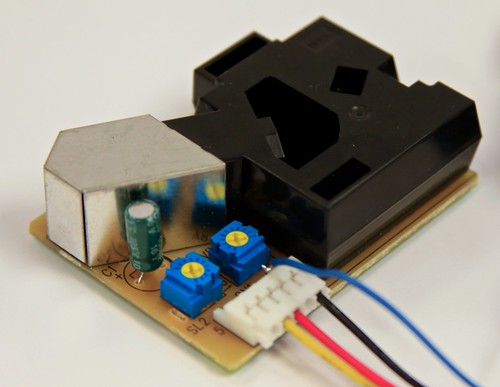
- Dust Particle Sensor
- Xively Account
- Voltaic Solar Kit
- Aruino Code
The Arduino GSM shield is a powerful module that enables connection to the cellular network. Using this shield, we can make phone calls, send text messages and even access web pages. All of this functionality relies on an active SIM card from any GSM carrier. We are using T-Mobile for our example.
The Dust Particle Sensor from Groove uses a small LED to detect the number of particles passing through the housing. To incorporate the sensor into the Arduino GSM shield, simply connect the black wire to the Arduino's GND pin, the red wire to 5v and the yellow wire to pin 8. The sensor ships with a connector which we simple cut off and soldered header pins onto the wires individually.
Following the hardware setup, we will need to setup a Xively account in order to display our data on the web. You can sign up for a Xively account here. After signing up for an account, click on "Add Device" which will setup your new data stream. Also, keep track of your 'Feed ID' and 'API Key' which will be needed in the Arduino code.
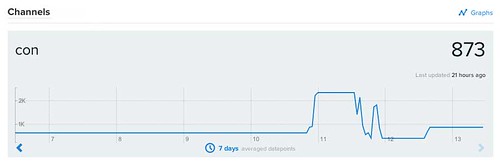
The Arduino code for this tutorial uses Xively's API to automatically set three streams of data for each PUT request which should automatically populate in your Xivly feed. These streams are the concentration(con) of particles, the ratio(ratio) of the particles to air and the low pulse occupancy(lpo) which is the raw data from the sensor. Each of these data points are sent in the content of the PUT request and should appear as three separate streams of data.
The final stage in this tutorial is implementing the Arduino code to connect both to your Xively account as well as your cellular network. All of the code can be found here. To begin, open the code in the Arduino IDE and modify the 'credentials.h' file to include your Xively API key, the 'Feed ID' and the name of the module(Xively User Agent). Then modify the 'airquality.ino' file to change the GPRSAPN to match you carrier. For T-Mobile the GPRSAPN is "epc.tmobile.com" and for AT&T the GPRSAPN is "wap.cingular".
The final piece to modify is the frequency that data is sent to Xively. This can be change by modifying the postingInterval variable which is set in milliseconds. Setting this will dramatically affect the battery life.
Once the sensor and all of the code are in place, you can connect the Arduino module to the voltaic v39's USB port labeled 'Tablets'. This port supplies 2000mA which is needed in order to power the GSM module. The GSM module has a power consumption spike initally while it is connecting to a network and during data transmission. As such, it is important to consider the frequency of data transmission as it has a direct impact on the power consumption from the battery. The code is initialized to send data every 30s.
By Nicholas Johnson